Wednesday, March 7, 2012

It's going to be a big, big, big day!!!

Are you a fan of the Hunger Games? Do you love fun, pretty jewelry? Well maybe you should check out our new little shop/blog. Our etsy shop is also OPEN!!


Saturday, February 25, 2012

You know how I love my moss!

 
I am itching to get rid of anything winter. Since we haven't had much of one I am just following suite with Mother Nature and jumping to spring.
Here is a cheap little craft to springify your home.
trace and cut out letters of choice from cardboard. I used the Bell font (regular) found here.
Hobby Lobby carries this sheet moss in the floral section for like $6.99 (I of course used a 40% coupon) seet is pretty big, it is folded into 4
After my letters were cut out I just glued them onto the moss. I trimmed around the corners and hot glued the edges down.
                                                              I LOVE THEM! I only used about 1/4 of the moss. So with the coupon I only spent about $1.50 to do this.

Monday, January 23, 2012

paper hearts a flutter

I feel like there is an awkward transition between Christmas and Valentines. There's a good 2-3 weeks where I don't feel like there is a season to decorate for. I was so excited when I felt it was ok to start putting a little more love in my home. I don't have very much heartsy decor so I made this
This is easy! It did take me a few days to complete because all I had was 10 minutes here, 10 minutes there. It was also easy because I would just do a flower or two at a time, that helped with the jumping back and forth.
I got sick of the regular paper flowers I knew how to make, so I would just google images of paper flowers and find one that looked interesting and do it. I would probably make about 2 of each flower I found. Then just hot glued them onto a heart shape I cut out.

The paper I used for this was a stack of double sided 12x12 cardstock I bought from Joanns by Anna Griffin the Carmen Collection. I loved this because in this stack of 24 sheets you get gold foil paper and glitter paper!

Even the wreath had a slight transformation for the holiday. If you couldn't tell.... I just love this yarn so much. It just has such great texture!

Friday, January 13, 2012

felt floral pillow delight

You may have seen pillows similar to this. I first saw this at a popular home decor store and again at a cupcake place and knew I just had to have one. I didn't want to pay the somewhat $40 and the thought came to me, the one that usually comes to me when I don't want to pay the money but absolutely find myself wanting/needing something, "I can make that"
FYI these photos are from my phone so they aren't the greatest sorry
(here the flower is finished but I still need to sew to edges of the pillow together and add a zipper)

So here we go....
for the size pillow I did (20x20) I used about 1 yard felt (I got my felt from Pineneedles in Gardener Village originally ~$9 a yard but used a 30% off coupon)
thread to match + needle
good scissors or a rotary cutter

I am not so bright with a sewing machine so I mostly hand stitched this the only thing I used a sewing machine for was to sew the edges of the pillow.
I cut out a petal template from a regular sheet of paper. the size of each petal ended up being about 3"x2" I also used a cup to keep my 1/2 circle petal smooth.
I then used my rotary mat/cutter to cut out each petal. To speed up this step you can stack your felt to cut out more petals at once.
Once each petal was cut I then stitched each petal together and made a petal train (I used a sewing machine for this part). For my 20x20 pillow I cut a piece of felt, 22x 42 (2" seam allowance) Starting from the center of the pillow I started to stitch the petal train in a small spiral and then eyeballed the spiral out. You could use a sewing machine if you like, but as I said before it was easier for me to hand stitch. It didn't take very long either.

I do love how this turned out. It was a gift for my dear sister-in-law. For my next one I will probably make my petals smaller and do more so it is more full.

Monday, January 9, 2012

missed me?

its true I lied. I promised I would blog at a steady pace and I didn't even make it a week! My whole family got sick, then I was a busy bee making Christmas gifts then we had Christmas and if that weren't enough we jetted off to Disneyland... Now I am back and ready to work. Its going to be fun!

Wednesday, December 7, 2011

shaped wood frames tutorial

What an exciting day it has been. It was so fun to be featured on
The Daily Dish (click link to go to video tutorial)
and share this tutorial with you all!
I'm sure I am not the only one that has found a way to make these mdf frames but I would like to share with you how I make them.
ITEMS NEEDED:
  • MDF board (I purchased mine from Home Depot, the 1/2"thick for~$10 and the 3/4" thick for~$11.50)
  • pattern for frame
  • skill/jigsaw (you can find the saw for around $30 in a quick search I found THIS)
  • drill
  • sandpaper
  • if painting: primer (Krylon), spray paint or acrylic paint
  • if mod podging: mod podge (of course), paper
  • painters tape: if painting stripes
This is just half of the large mdf board from Home Depot, if you are making 12"x12" frames you can 8 frames out of 1 large board. depending on the thickness you choose and the paint the cost is about $1.50-$1.75 per frame! You can't beat that! The large stripped frame in a previous post and featured on the video is one full board that I free handed the pattern for

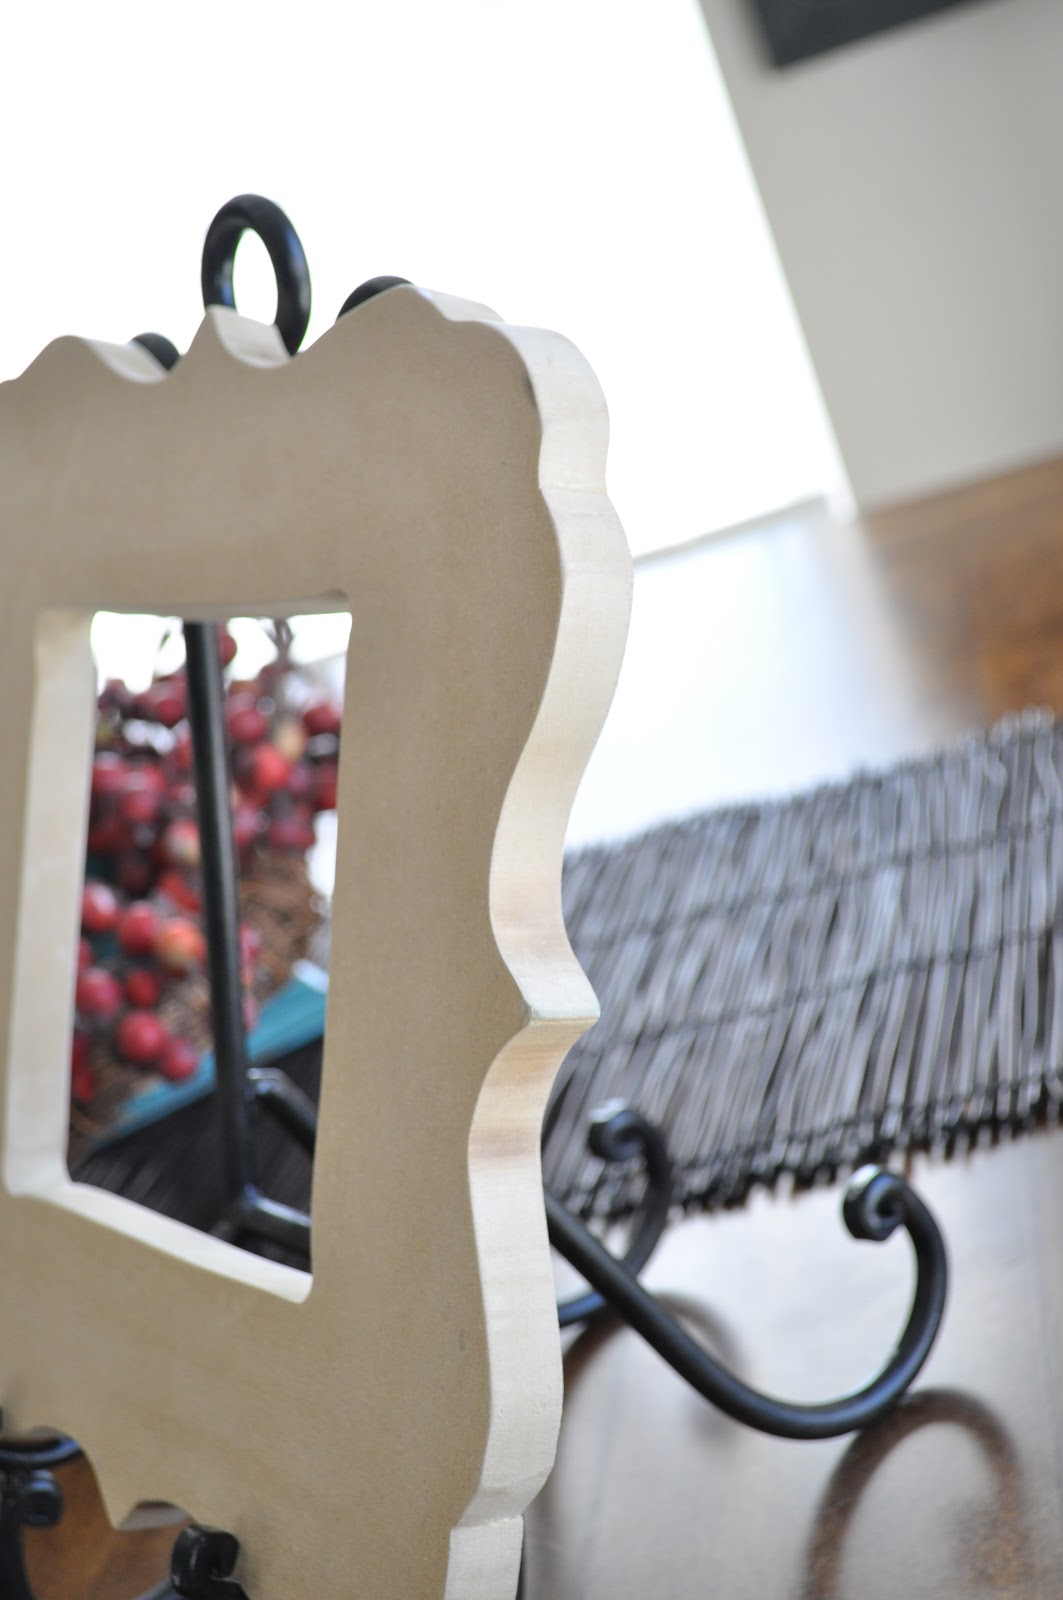
Next trace your pattern for frame (you can free-hand it or use paper with decorative edges, I like My Minds Eye paper for this) Try not to get too complicated with your pattern, the more curves and edges, the more difficult it is going to be to cut out.

I cut out a 6x6 paper to trace the opening part in the middle
Use the skill/jigsaw to cut out the center. You might want to make a few practice cuts if you aren't very comfortable with the saw, just please be careful! It really isn't too bad, it just takes some getting used to.
 Once the outside is cut, use a drill to cut out the center, ignore the spot I have in the center of the frame, drill the hole in one of the corners and then use the skill saw from there.

 *optional next step: if you have access to a router, now would be the time to pull that bad boy out. A router will give the frame a bumpy edge (see photo bellow) and a fun texture.

Then sand, sand, and sand! Sand paper is perfectly find for this but....
 if you happen to come across a metal file in your tool bag, celebrate just a little bit because this bad boy really helps in the creases.
 Once you are all done sanding you are really to funk-ify your frame however you like
  • spray paint: if you will be spray painting use a primer first, absorbs paint like no other so primer will help you not have to do so many layers.
  • paint stripes: first prime the board, then apply the first paint color (the lightest one), measure out your stripes and tape off, paint your next color.
  • acrylic paint
  • use glaze to antique
  • mod podge paper or fabric: paint or stain the edges of the frame, then apply thin layer of mod podge to frame and add paper, smooth out with popsicle stick or credit card. If the paper over laps, just use sand paper to clean up the edges.
This is just black acrylic paint, you can see how the frames absorbs the paint. 
 This is spray painted and then the edges were sanded. to add the picture you can adhere your photo to cardboard or something stiff and then use a good tape to bond it to the frame.
You can display these babies on easels or use a picture hangers for the back.

Tuesday, December 6, 2011

coming soon....

A full tutorial on these wood frames.... WOOOHOOOO!!
I also have a promise. I promise to post something new at least once a week. I am a full time mom and sometimes it is hard to take the time to do so, but this is my goal.... and I am going to have some fun doing so!

Magnetic family tree

A couple of years ago a local craft/paper (Heartland paper) company had a beautiful magnetic family tree.  It was beautiful and perfect for my home, it was also perfect for a woman's group activity (hurray for Relief Society!)
This is my board and my lovely family. This one is 16"x20". The paper is just mod podged on to the magnet board. I used e6000 to adhere the bottle caps to the magnets and a 1" hole punch to cut out each photo. Each bottle cap should have some leaves on them, but I got a little lazy.
There are many places around me you can find a magnet board, but because I was getting them in bulk I chose Etsy. She also sold me the bottle caps. I got to thinking that it would be an awesome birthday gift/undertaking to make this for my grandmother. I come from a large family, a VERY LARGE FAMILY. To fit the full 160+ bottle caps I needed a large board, I did a 40"x50".
Some perspective of just how big this board was.
 I measured the paper and designed and drew out the tree, sorry I have no pattern for that but I did use a poster board  to make a pattern from first and then drew it out on paper.
I had to section them off into families because there are just SO many family members!
The finished product, hanging on Nonna's wall.

Ruffle tree skirt

Like many other ladies with a good eye, I pinned THIS on pinterest and knew I didn't want it to just be a "someday" pin... I had to make it asap.


So I did, of course. After some blisters and loving husband to tend after the little ones, I finished!
Just some notes, my ruffles are 2" a friend of mine did this skirt with 3" ruffles which means less rows but it was breath taking, I kind of wish I would have done 3" just because of the time.
You get to choose the lesser of 2 evils, if you use a high temp glue gun, you get burned... use a glove (garden, snow, etc.)... if you use a low temp glue gun you will get blisters from squeezing the trigger.
My fabric is muslin from hobby lobby (originally $5 a yard but 40% off!) I used a canvas drop cloth like in the tutorial, mine was a 5x5 from home depot (~$7)
I love it and am so happy to finally have a beautiful tree skirt!

Wednesday, November 16, 2011

Fall decor

 I decided I needed to finally take down Halloween, and since I refuse to put up Christmas until after Thanksgiving I needed that fall transition.
This month we have started a gratitude chain, daily as a family we will find a handful of things we are grateful for and add to the chain. It has been a great opportunity to try to help Oliver understand what gratitude means, yesterday he added nursery, friends, and then listed all of his aunts, uncles and cousins.
Tutorial for the felt wreath:
Supplies: 1/2 yard of felt, hot glue gun, wreath form (mine is a small foam one from the dollar store)
cut circles ranging from 3-4" diameter. Next fold circles into many different ways ex. fold in half then half again. I played with many different ways to fold so they wouldn't look so uniform. Next just hot glue folded circles onto wreath form
Cost ~$3.50
The "Thankful" frame is just some scrapbook paper with painted chipboard letters. I like that the chipboard letters are simple yet they give some dimension. This frame will stay on my table and I trade out the picture for every holiday.

 I think this wreath looks better in person, I don't love how it looks in a picture. But I also use this wreath all year long and trade out the embellishment. These are felt flowers. you first cut a circle and then cut the circle spiral like (does that make sense) and then roll up the cut circle into a rosette. I like when the circle isn't perfect, I add some curves as I cut the spiral. This way when you roll up the rosette it isn't all uniform. I added wire to the back of each rosette and then just stuck them into the wood wreath.
I'm kind of a cheap person, so when I decorate I try to use something as the 'base' and then build up/take down from there.
This guy isn't new, I made him last year. I think I saw this on Good Things Utah? but this is mostly paper cut into ~3" & 2" circles and folded to make the feathers